Dec 17, 2016

Christmas Gingerbread Biscotti


Cook's Notes: I was looking on Pinterest for a Biscotti recipe and ran across this one. I have never made biscotti, so I thought I'd give it a try. This recipe is easy and just perfect and I usually change something about every single recipe and make it my own...but not this time! I will give full credit to "If You Give a Blonde A Kitchen". Her recipe is spot on and I am sharing it with you - check her out! 
My first attempt at Biscotti was not visually pretty, I will have to work on my technique, but they sure did taste great! 

Recipe Here: http://www.ifyougiveablondeakitchen.com/2013/12/06/gingerbread-biscotti/

What You Will Need:
·         2 1/4 cups all-purpose flour
·         1 1/4 cups brown sugar
·         2 teaspoons ginger
·         1 teaspoon cinnamon
·         1/2 teaspoon ground cloves
·         1/4 teaspoon allspice
·         1 1/4 teaspoon baking powder
·         1/4 teaspoon baking soda
·         1/2 teaspoon sea salt
·         2 eggs
·         2 tablespoons molasses
·         1/2 teaspoon vanilla
Directions:
1.      Preheat oven to 350ยบ F. Spray baking sheet with Flour Non-Stick Cooking Spray.
2.      In a bowl, whisk together all of the dry ingredients. Set aside.
3.      In your stand mixer with a paddle attachment, stir together eggs, molasses, and vanilla until well combined. Slowly add the flour mixture and mix until it forms a doughy ball.*
4.    Flour work surface and transfer dough to the surface.
5.      Divide dough in half and form each half into a fat log about 10 inches by 2 inches. (For an idea of how it should look - see photo here Miss In the Kitchen): 
6.      Place logs about 4 inches apart on the baking sheet and bake for 30-40 minutes, the surface will spring back when gently touched. Let cool 10-15 minutes.
7.      Once cooled, move log from baking sheet to cutting board. With a serrated knife, cut log into 3/4 inch slices on the diagonal. Place slices back on parchment lined pans, cut sides down. Repeat with second log.
8.      Bake 10-15 minutes, flipping biscotti over half way through. The baking time depends on how dry you like your biscotti. Longer baking time (15 min.) makes a harder, crunchier biscotti.
9.      Let biscotti cool on a wire rack.
For the Glaze: 
    Vanilla Bean Glaze (from: If you Give a Blone A Kitchen)
  • 1 cup confectioners' sugar, sifted
  • 1 teaspoon real vanilla extract
  • 1 tablespoon butter, melted
  • 1 tablespoon milk
  • Pinch of salt
  1. For the glaze, whisk together confectioners' sugar, vanilla extract, butter, milk and salt until combined. Add more milk if necessary to reach desired consistency. Drizzle biscotti with icing mix.


Dec 10, 2016

Gingerbread Bundt Cake


Cook's Note: I saw this recipe on Pinterest and had to try it because Gingerbread is one of my Top 10 loves in this world. The skill level for this recipe is medium, there are a lot of steps. It made my house smell like a dream and turned out fairly pretty. Highly recommend with a cup of coffee with Gingerbread Creamer! 

What You Will Need:


3 cups all-purpose flour
2 tablespoons ground ginger
1 teaspoon ground cinnamon
½ teaspoon ground cloves
¼ teaspoon sea salt
2 teaspoon baking soda
1 cup butter, room temperature
½ cup brown sugar, packed
1 large egg
1 cup molasses
1 cup boiling water

Directions:


Preheat your oven to 350. Spray your Bundt pan with non-stick cooking spray (I use the kind with flour, such as Pam for Baking).

Next, Mix all of the dry ingredients together in your stand mixture (except for the baking soda) and set aside.

Cream together the butter and sugar until smooth and add the egg and beat until well mixed. Next, add the molasses into the mixture. Set aside.

Add the baking soda to the boiling water and stir to dissolve. Set aside on stove.

Now, back to the ingredients in your stand mixer…..
·         Slowly beat of the dry ingredients into the molasses mixture until just combined.
·         Next add ½ cup of the boiling water into the mixture until the water is fully mixed into the batter.
·         Slowly beat of the dry ingredients into the molasses mixture until just combined.
·         Next add ½ cup of the boiling water into the mixture until the water is fully mixed into the batter.
·         Slowly beat in the remaining of the dry ingredients.
·         Slowly pour batter into Bundt pan.

Bake for 30-40 minutes or until a toothpick inserted into the cake comes out clean.

Be sure to cool for at least 30 minutes before turning the Bundt pan upside down onto a cooling rack.

Gently sprinkle with confectioners’ sugar before serving (through a handheld mesh strainer, if possible).


This Pinspiration comes from: Pretty Practical Pantry


Oct 9, 2016

Crunchy Baked Chicken Parmesan


Find it on Pinterest

Cook's Note: You will be suprised at the secret ingredient in this recipe... it's RICE KRISPIE cereal. This was a very light and delicious chicken recipe that I will make again and again. A big hit in my house!


What You Will Need: 
4 Boneless Skinless Chicken Breasts
1 Cup of Crispy Rice Cereal (crushed) 
1 Tbsp Italian Seasoning
1 tsp Garlic Sea Salt
1 tsp Ground Black Pepper
2 Tbsp Grated Parmesan Cheese (Such as Kraft)
2 Eggs, slightly beaten
1/2 Jar of Pasta Sauce
1/4 Cup Shredded Parmesan Cheese

Directions: 

Preheat oven to 400 degrees. Spray a large glass casserole or baking dish with non-stick cooking spray (I always use Coconut Oil Cooking Spray).

In a large bowl, mix together crispy rice cereal, seasonings and cheese and set aside. 

In a separate bowl place beaten eggs and dredge each chicken breast in the egg, then coat thoroughly in the cereal mixture and place each coated chicken breast into the baking dish. 

Bake for 25 minutes or until crispy brown. Remove dish from oven, top the chicken with pasta sauce and sprinkle the shredded cheese across the chicken and bake for an additional 5 minutes. 

Serve with angel hair pasta or with a nice side salad and garlic bread. 

Enjoy!

This Recipe was Born in Virginia, in my kitchen! 


Sep 27, 2016

Dannon Light and Fit Pumpkin Pie Yogurt


Hey everyone! While I realize this is a departure from our normal find and test a recipe post, I felt like I had something yummy to share that does not involve cooking. A few years ago I discovered Dannon Light and Fit Pumpkin Pie yogurt. It is 80 calories, only 7 grams of sugar and has 12 grams of protein, so it is pretty good for you. Well, it tastes EXACTLY like Pumpkin Pie, I mean it is amazing stuff. (This is not a sponsored post by the way!)

While this yogurt is seasonal, and can be difficult to find, I get it at Walmart or Food Lion, it is worth the hunt. When I see it, (insert red face) I am embarrassed to say, I buy out the store's entire stock (usually around 8). While everyone else is eating yummy Fall and holiday treats, I will take my yogurt and a scoop of lite Cool Whip and have myself an 80 calorie pumpkin pie!

This stuff is also great in smoothies with some cinnamon and milk and part of a graham cracker blended in.

Anyways, just a quick tip for some healthy holiday snacking. Enjoy your day!

Sep 22, 2016

Our Fall Home Tour 2016

Welcome to the Fall Home Tour 2016! Today is the first day of fall, although, you wouldn't know it by the temperature outside (it's 80 degrees here in Virginia!). There is a hint of fall in the air and we always look forward to this time of year. It reminds us of our childhood. The anticipation of fun fall activities like apple picking, wearing sweaters, eating pumpkin flavored foods, cozy blankets, bonfires, planting mums, picking out your pumpkin, carving pumpkins, drinking apple cider, leaves changing - and these are in no particular order. 

Our favorite thing is decorating for fall. I have not put out Halloween decor yet, just Fall for now. We'd like to share the nooks and crannies of our home with you! Won't you join us for a tour?


We did an "Autumn Home Tour 1) and "Autumn Home Tour 2 "post last fall (2015) and we loved doing that, so we thought we'd do it again this year! 


The new sign that says "Happy Pumpkin Spice Season" was given to me by my best friend and co-author here. She knows me all too well! I hang it with pride and LOVE my newest fall decor. 


Amanda's Fall Home Tour


The wreath on my front door... I bought the burlap wreath pre-made and I just put a wooden letter "S" on it and change out the bow and decor on it every season. 


 This simple pumpkin "Happy Fall Y'all" sign belonged to my Mother and used to hang on her front door every fall. When I was younger, I used to hate it and think it was stupid. I now I proudly hang it in my house - it reminds me of her and my roots - I am a southern girl, after all! 

My antique hallway table belonged to my grandmother (it's over 50 years old) and the table alone is dear to me! I change up the table decor seasonally for fun. 


Here is a fall wreath that I made myself - I have it hanging in the kitchen, I like it, its very festive!


My mantle... I love it, what can I say? I bought the mirror about 5 years ago and its one of my favorite things in my house. I don't know why, it just is!


 This bowl is just a concoction of pumpkins that I bought a Michael's, surrounded by more pumpkins and wooden acorns. 

Lastly, here is my living room table with white pumpkin candy jar. It's simple, but I love it. I've had this candy jar for years! 


Nichole's Fall Home Tour

Amanda's fall decor is so festive and pretty, and the best part about it is that many of the pieces have meaning to her and great sentimental value. Love that! I am going to jump right in with a few pics from what I have done so far, I am not finished with my outdoor decor, so I will give a little sneak peek for now at the gorgeous mums on my porch (before I likely kill them). Come on in everyone......

This is a new creation this year, I started with the wooden box and just thought, Cinderella pumpkins would be perfect! I keep this on my coffee table so everyone can see over it, but it still provides a nice centerpiece. 


Welcome to the coffee station. There are pods in the white pumpkin and a pumpkin mug ready to go. We use this spot more than any other in the kitchen and I like the whites with a little fall twist. 


The dining room table always gets a centerpiece that screams Fall, so this year I purchased some lanterns from Pier 1 and embellished. You can't see it here but there are tiny lights strung throughout the leaves. 


My stone fireplace is so pretty I like to do it up big without over doing it. I think it turned out pretty good this year and I love my monogrammed pumpkin from a sweet friend for my birthday. 


The couch needs to be pretty and comfortable, so I opted for plaids, browns and oranges this year and I love it! It is very cozy and with our plaid fuzzy blanket it just screams Fall. 


As I mentioned before my porch is not yet totally transformed, but here is a peek at the mums, which are just incredible and a leftover Summer plant that was too pretty to throw away. My tiny scarecrow is barely noticeable in all that greenery! 


Just a small acorn gives the powder room a little Fall feel. 


This big guy resides in the kitchen and is great to store those Fall baked goods that start showing up in the house around this time of year. 


We hope you enjoyed the Fall Home Tour 2016! We are so happy you were here to share the beginning of our favorite season!

Welcome Fall


Sep 17, 2016

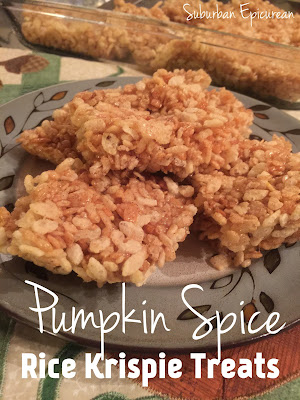
Pumpkin Spice Rice Krispie Treats


Note from The Cook: It's Rice Krispie Treats with Pumpkin Spice flavor - what could be better when these 2 worlds collide?  This recipe could not be any simpler! Just use the original Rice Krispie recipe and add Pumpkin Spice - its really that easy. I give full credit to Kellogg's ....ENJOY!

What You Will Need: 
  • 6 cups Kellogg's® Rice Krispies® cereal
  • 3 tablespoons butter
  • 1 package (10 oz., about 40) JET-PUFFED Marshmallows
  • OR
  • 4 cups JET-PUFFED Miniature Marshmallows
  • 1 Tbsp Pumpkin Pie Spice
Directions: 

In large saucepan melt butter over low heat. Add marshmallows and stir until completely melted. Remove from heat.

Add KELLOGG'S RICE KRISPIES cereal and Pumpkin Pie Spice. Stir until well coated.

Using buttered spatula or wax paper evenly press mixture into 13 x 9  pan coated with cooking spray. Cool. Cut into 2-inch squares. 

This Pinspiration  comes from Kellogg's and Who Needs a Cape

Jul 24, 2016

Smokin' S'Mores - Chocolate Dipped Marshamallows with Graham Cracker Topping


Here's a simple summer treat that I made for my daughter's birthday party - it was a real hit! You can't go wrong with this combination. They are SO EASY to make too!

What you will need:

1 Bag of Jumbo Sized Marshmallows
1 bag of Hershey's Milk Chocolate Chips
1 package of Graham Crackers - crushed
wooden skewers

Directions:

Melt chocolate chips in a glass bowl, in 30 second increments in the microwave, until totally melted - stirring well each time.

Place Graham Cracker crumbs in a shallow bowl.

Place Marshmallows on a Skewer and dip each one half way into the melted chocolate - covering the bottom in chocolate - then dip the chocolate bottom into the graham cracker crumbs.

Lay each chocolate/graham cracker dipped marshmallow onto a cookie sheet, covered in wax paper. Let "air dry" for about one hour to set.

ENJOY!

Apr 26, 2016

Apricot White Chocolate Scones


Find it on Pinterest


COOK'S NOTE: I had an apricot white chocolate scone many years ago and it was amazing. So amazing that I have craved another one ever since. I came across this recipe recently and knew I had to make them. They tasted just like I remember, and now the only problem is I want to make them all the time! Even if you are not a big scone fan, these are different, they are not dry, they are not blah, they are moist and flavorful. They will go great with tea, coffee, breakfast or a snack. Let me know what you think. ENJOY!

Ingredients: 

2/3 Cup butter (unsalted)

3 1/2 Cups flour

1/2 Cup Sugar

4 Teaspoons baking powder

1/2 Teaspoon salt

2/3 Cup finely chopped dried apricot

1 Cup white chocolate chips

2 Eggs

2/3 Cup half and half

1 Teaspoon vanilla

Granulated sugar for topping, optional


Directions:

1.  Pre-Heat oven to 400 degrees

2. In a large bowl cut together butter, flour, sugar, baking powder and salt until mixture is crumbly

3. Stir in apricots

4. Add eggs, half & half and vanilla so the dough forms a ball

5. Turn the dough onto a floured surface and knead lightly ten times

6. Divide the dough into two equal portions

7. On greased baking sheets pat each portion of the dough into an 8" circle and cut into 8 wedges

8. Sprinkle with sugar if desired


9. Bake about 15 minutes, until golden. 

Serve warm

This Pinspiration comes from FOOD.com


Apr 25, 2016

Double Hot Fudge Bundt Cake


Find it on Pinterest

COOK'S NOTE: The original name of this cake is the Ultimate Chocolate Fudge Bundt Cake and I tweaked it a little, but either name tells you that it is going to be delicious, rich, sweet, chocolatey and fattening.....just the way I like it! I mean the pictures speak for themselves, there is nothing about this recipe that I would change. I used a jar of fudge sauce as a time saver and just heated it up prior to pouring it on, but the homemade is obviously better. You can add whipped cream if you wanted, or even strawberries, but aside from that, make it, eat it, love it, repeat. ENJOY!


Ingredients:

1 18.25 ounce chocolate cake mix 
(I used fudge cake. If you cannot find this size, use what you can find and add a little more from a second obx)

1   3.4 ounce package of instant chocolate pudding

2   Cups of sour cream

3   Eggs

1/3 Cup vegetable oil

1/2 Cup water

2  Cups Semi-sweet Chocolate Chips

1  Jar Hot Fudge sauce for topping (as much or as little as you want, heated)


Directions:

1. Pre-Heat oven to 350 degrees. Grease and flour a 10 inch bundt pan

2. In a bowl beat all ingredients, except chocolate chips, until well blended. Fold in chocolate chips.

3. Spoon thick batter into the prepared pan

4. Bake 50 minutes to 1 hour

5. Let the cake cool for 15 minutes before transferring to a wire rack to cool completely

6. Heat fudge sauce and drizzle as much or as little as you like. 


This Pinspiration comes from: Let's Dish Recipes