Dec 21, 2015

Christmas Home Tour

The countdown is on! As we approach the big day we are enjoying time off with family and friends, and it is during this time that I really enjoy our holiday home decor. The lights are always on and the Christmas music is always playing. This week is time to wrap the gifts, bake the cookies, and for me, make my extensive grocery list for Christmas Eve and Christmas dinners! Here are a few photos of my 2015 Christmas home for you to check out, Send us some photos of your Christmas decor too. 


Dec 13, 2015

Christmas Teacher Gift - Tea & Jam Plate


We were at a Christmas craft show in November and got this idea for a gift & we ran with it and made it out own. It was easy and fun to buy all the stuff to make it.

Here's what's in the gift:
Small dessert Plate
Small Jar of Jam/Jelly
Chocolate
Tea Bag
Spreader

Make it!! 
Small dessert plate. This time of year you can buy cute Christmas plates everywhere & usually in packs of 4 or more. We found these at Homegoods.

Next we add items of your choice on the plate ....we chose a small jar of gourmet Jam or Jelly, a chocolate, a tea bag & a cute holiday themed spreader. Tea & Jam plate!!

How cute is this? You could add anything on this plate really ...just use your imagination! Include a gift card too for a really nice gift!

Now, just wrap in clear wrapping paper with a cute Christmas design, tie it up with pretty ribbon and tie on a cute gift tag!

Voila .... You are DONE!! The teachers will most likely think this is cute & unique.

I had to make 6 of them ...BOO! But they turned out soooo cute!


Dec 11, 2015

The Adventures of our ELF ON THE SHELF


If you've come to this blog post, I will guess you are a parent that has an Elf on the Shelf. Congratulations, Mom & Dad - you have to remember to move your elf every single night for the next 24 nights (if you start on December 1st, that is!) It can be a hassle - right? But - its mostly fun for you and your children. Make the MOST OF IT!

Like you, we scour Pinterest for ideas for our Elf and come up with some of our own on the fly. 

My Elf is not overly mischievous. Our Elf is more cute and kind - we keep it simple. Our Elf also brings small gifts whenever my child has been really good the day before. It give my little one something to look forward to. 

REMEMBER THESE IMPORTANT THINGS ABOUT YOUR ELF ON THE SHELF: 

  • Your child won't be this little for long, so enjoy the Elf as much as they do! The magic of Christmas lives strong in your child's heart. 
  • It's only for one month a year (actually less than a month) that you have to move the Elf around. One day your child won't believe anymore and you will actually MISS this. 
  • Make it fun for you and your child ... there are so many ideas out there that are simple and enjoyable. 
  • We advise to stay away from the "naughty" Elf activities that you may see on Pinterest. There are some REALLY bad ones on Pinterest that are FUNNY, but also DISTURBING! 

Here are some of our ELF Adventures..... we will add more as the season continues...

The First night that our Elf came - she brought an ADVENT calendar !


Our Elf got into the Reese's Pieces!


Our Elf likes to ride the Rocking Horse at night!


 Our Elf leaves little gifts - like these window clings for my little one to decorate! 


We hope that we've given you some ideas......More Elf adventures to come!!! 


Nov 24, 2015

Pilgrim Hat Cookies


Find it On Pinterest

Cook's Note: I saw these adorable cookies on Southern Living's Facebook page and thought to myself "Wow, my child would LOVE to make this with me!" It looked too easy to pass up. We enjoyed making these and will serve them at Thanksgiving for a kid's dessert. You can't get any easier and cuter than this!

What You Will Need: 

1 package of Fudge Stripe Cookies
1 package of Miniature Reese's Cups (unwrapped) 
1 small package of Reese's Pieces 
Icing

Directions: 

Lay each Fudge Stripe Cookie face down, place a dollop of icing on top and place the Reese's Cup on top and push to spread the icing. Place a small dot of icing on a Reese Pieces and push the candy on the side of the Reese's cup.

There you have it! A simple and fun dessert that the children at your Thanksgiving feast will LOVE! 

This "Pinspirations" comes from Southern Living


Nov 23, 2015

Crock Pot Hot Chocolate

 Find it on Pinterest

Cooks Note: Today was our first really cold day of the season. I am talking 24 degrees for the low, so the kids were ready for some hot chocolate when they arrived home from school. I saw this on Pinterest and I am not going to lie, I thought why would you make it from scratch when you can have it done in 2 minutes from the microwave or the Kuerig? Well, now I know why. This is very simple to put together, but you have to make sure to think ahead, because it takes 2 hours to cook. But, when it was done it was the most decadent, smooth, creamy, delicious hot chocolate I have ever tasted, hands down. My sister said she felt like she was drinking a chocolate chip cookie. The kids loved it, and I know you will too. This is now the only HC we will ever drink. 

Note: I added a small packet of Truvia to the mix since I used semi-sweet chocolate chips.
Serves 6-8

Ingredients

  • 1.5 Cups whipping cream (I used half and half)
  • 1 14 oz can sweetened condensed milk (I used the lite version)
  • 6 Cups milk (whatever you prefer, I used 1%)
  • 1 teaspoon vanilla
  • 2 Cups chocolate chips (Milk or Semi-Sweet, whichever you prefer)
  • I added one small Truvia packet


Instructions:

  • Stir together the cream, milks, vanilla and chocolate chips in the crock pot.
  • Cover and cook on low for 2 hours, stirring occasionally, until mixture is hot and chocolate chips have melted. Stir again before serving. Garnish as desired. 
TIP: To change it up a bit, you could always use white chocolate chips or add a little mint extract for a chocolate mint flavor. 


This Pinspiration came from mrshappyhomemaker.com


Nov 16, 2015

Broccoli Slaw Chicken Salad


Find It On Pinterest

Cook's Note: I love broccoli slaw and I saw this recipe on Pinterest and thought I'd give it a try - I wanted something yummy, healthy and DIFFERENT and this seemed to fit the bill. I really liked this recipe and hope you will try it! This is similar to our Chinese Ramen Noodle Chicken Salad recipe, the only difference is that this recipe uses broccoli slaw instead of cabbage and also a different oil. Who doesn't love salad?
 

What You Will Need:

2 Packages of Ramen Noodles (Chicken Flavor)
2-3 Small Chicken Breasts (cooked and chopped or shredded)
1 package Broccoli Slaw
1/2 cup Slivered Almonds (toasted in a pan)
1/4 Cup Sunflower Seeds
1/2 bunch of green onions, finely chopped
1/2 cup Sugar
3/4 cup Vegetable Oil
1/3 White Vinegar
 

Directions:

In a large bowl (with lid) ....crush the ramen noodles in the package by squeezing and breaking the pieces. Open the package and dump the crushed up noodles in the bowl (take out the flavor packs and set aside - you will use only ONE package of the flavoring). Add in chicken, broccoli slaw, almonds, sunflower seeds, green onions.
 
In another bowl mix together one packet of the chicken flavor, sugar, vegetable oil and vinegar. Stir well and pour over the salad and mix thoroughly.
 
This salad tastes better if it sits for at least 30 minutes and even better overnight (it marinates better).
 
This "PINSPIRATION" comes from Food.com
 
ENJOY!


Nov 1, 2015

Chicken Bacon Ranch Casserole


Find it On Pinterest

Cook's Note: I was in need of a recipe that I had on-hand ingredients for and I ran across this gem on Pinterest. Of course, I didn't have ALL of the ingredients that the original recipe called for, so of course, I changed it and made it my own. This recipe is DELICIOUS and I think we will be making it again VERY VERY SOON! 

What You Will Need: 

1 lb Ground Chicken Breast
1 tsp Cavender's All Purpose Greek Seasoning
2 Cans of Cream of Chicken Soup (Suggest Making your OWN: RECIPE HERE)
1/2 Bottle Ranch Dressing
4-5 Slices of Cooked Bacon (I used Turkey Bacon)
1 Box of Elbow Macaroni (or pasta of your choice)
1 Cup Cheddar Cheese
1/2 Cup of Cracker Crumbs

Directions: 

Preheat oven to 350 degrees. 

Cook pasta according to the package directions. Drain and set aside. 

Brown ground chicken breast in skillet, seasoning with Cavender's seasoning if you have (otherwise, use salt and pepper to taste). 

If you are making your own Cream of Chicken Soup, double that recipe (and I highly suggest that you make your own because of 2 reasons: 1) It tastes a million times better 2) the canned version is straight chemicals). 

Mix the Cream of Chicken Soup, Ranch Dressing, Bacon, Pasta, cooked Ground Chicken Breast and Cheese together and place into a large 9x13 casserole dish (sprayed with non-stick cooking spray). Top with cracker crumbs and bake for 30 minutes or until toasty brown on top. 

Enjoy!


This "Pinspiration" comes from: Plain Chicken

Oct 30, 2015

Autumn Home Tour (Part 2)


One of the reasons Amanda and I get along so well, like sisters really, is that we share common interests and our love for Fall is a big one! We love to decorate, eat (of course) and visit all of the beautiful places in Virginia during the season. So, decorating our homes is par for the course! So, I continue the Autumn Home Tour with some pics from my house during this colorful and exciting season. 


One of my favorite parts of my new house. My pretty fireplace. 


In true Suburban Epicurean form, a Fall cookbook 


My favorite pumpkin soup tureen stays on the counter September until Thanksgiving


My favorite thing in the world is pillows. I have so many pillows it is a joke at my house, and quite honestly may be an addiction! I love this pumpkin and gourd lumbar from Pottery Barn. 


I love the look of Indian Corn, it is so colorful and is really indicative of the season. It looks great in a vase, in a bowl or even a cornucopia. 


This is my dining room table. Mixing up my everyday decorations like the basket with some autumn  touches is always fun. 


Another one of my loves....PUMPKINS, I am particularly into white pumpkins lately. 


Again with the pillows, I told you. 


Halloween Treats


Cooks Note: Halloween is a love it or hate it holiday, if you can call it a holiday. For me, the next day marks the beginning of the holiday season, for some it is just annoying and for others it is an excuse to party. Whatever your feelings are about Halloween, kids love it. Everyone loves candy, everyone loves being someone they are not for one night and personally, I like the décor and cute little snacks and goodies that come along with it. My kids wanted to take treats to school for their "Fall Festival" so I needed something quick and easy that I could make 50 of in one night, and this is what we came up with. I made 32 ghosts and 25 monster teeth in about 1.5 hours, not too shabby! Give these a try for your kids, for your Halloween party, or just because they are delicious! Happy Halloween everyone, stay safe!


Monster Teeth:

1 package chewy Chips Ahoy cookies
1 package of mini marshmallows
1 container white frosting
Red food coloring

1. Mix red food coloring into icing until you have reached your desired shade of red. I was going for blood or gum color so I used a little extra coloring
2. Cut all of the cookies in half
3. Spread a little bit of icing on the inside of each cookie half (don't let it drip over, just enough so it holds the marshmallows and looks like gums)
4. Place 3-4 marshmallows across one half of the cookie on the rounded edge
5. Top with the frosted side of the second half touching the marshmallows


Ghost Pretzels:

1 bag of pretzel rods (the long ones, not the little skinny sticks)
1 bag of White Candy Quick
Black cake decorating pen or small black icing tube

1. Melt candy melts, according to package directions.
2. Once melted, place half of each rod in the candy, rolling to cover the pretzel,
3. When lifting out of the candy, rotate the pretzel around in circles to let the excess drain off
4. Allow candy melts to dry on a sheet of wax paper
6. Once dry, decorate the face with 2 eyes and a mouth.


Oct 28, 2015

Crockpot Baked Apples


Find it On Pinterest

Cook's Note:  I had a craving for apples this week! Fall is underway and Halloween is fast approaching! The leaves are a lovely golden yellow, orange and red and the wind has that gentle breeze that calls my name outside today. I decided to cozy up to this recipe and throw the ingredients in a crock pot and let the smell overtake my home!

What You Will Need:
6-8 apples, Peeled, Cored and Sliced
1/2 cups of granulated sugar
1/4 Light Brown Sugar
1 tsp Ground Cinnamon
1/4 tsp Nutmeg
2 Tbsp Unsalted Butter, cut into small cubes

Directions:
Place apples into crockpot and top with rest of ingredients. Stir mixture and cook for 4 hours or until apples are soft.

Serve however you like! Ideas: You can place in a bowl and top with Whipped Cream or Ice Cream. Eat at breakfast on top of toast or an English Muffin, the ideas can go on and on! :)

This "Pinspiration" comes from: Eat Drink Love

ENJOY!


Oct 27, 2015

Autumn Home Tour (Part 1)

As I sip my Pumpkin Spice flavored coffee this morning, I look around my house and smile and take it all in. I absolutely love this time of year. Particularly, the week of Halloween is one of my favorites. This is the week that the leaves really all start to turn gorgeous colors, a chilly breeze is blowing and all seems right in this little corner of the world. It reminds me of school days gone by and the childhood excitement of upcoming Halloween preparations and pumpkin carving!
I thought I would give our readers a little fall home tour - sharing some of my favorite fall decor with you all. My Mother absolutely loved fall so much and she passed this love on to me. She passed away almost two years ago and I inherited many of her decorations, which I proudly display throughout my home. I guess I love my decorations so much, because they remind me of her.

I hope you will enjoy!

This is my view from my kitchen window this morning. I just love the trees turning outside and my little fall window display. It makes me happy!

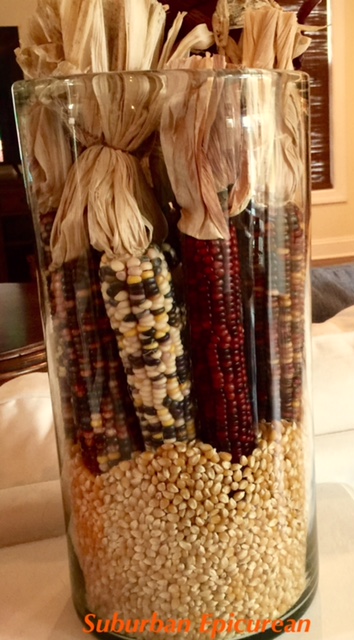
 Maybe a bit cheesy, but here is my kitchen table - as you can see, we love pumpkins! Everything here was from my mother - I love it!

Here is my little candy bowl that my little candy grabbing munchkin always tries to get her hands on. I bought this bowl at Harry & David back in 2001, this is virtually an antique by now (haha) :)

Here is a quick peek at my mantle. The wooden pumpkins were used in my wedding as table decorations, they are special to me, so I tried to incorporate them here!


My hallway table display, I just love it! The white candle holder that looks like a sweater is my newest addition and I'm head over heels for it. 
Here's a secret - I'm burning a "Leaves" candle from Bath & Body Works inside and the smell is divine!! Yum!!

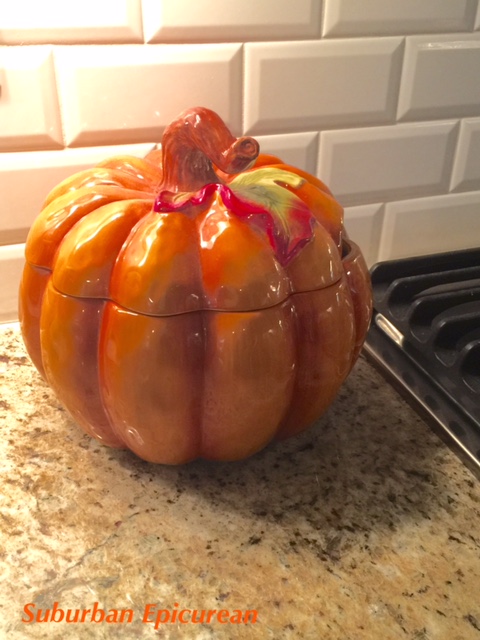
Here is my Fall prized possession- my huge ceramic Jack-o-lantern. Trust me, it's HUGE and HEAVY! I inherited this from my Mom. She bought this at the Eddie Bauer Home Store back in like 2000 or 2001 (that store no longer exists). I remember the day she bought it, I was in love! I'm proud to call it my own now. I look forward to pulling it out every Halloween. It's sitting in my hallway.

This witch hangs on a hallway door. LOVE HER! She's a staple here, I've had her for years. I think I got her at Home Goods! 

Here is my little stool by the front door, displaying my pumpkins and cute little Halloween skeleton Boyd's Bear. He's adorable and my little one loves looking at it. 

My cute little bathroom display - yes, you need fall decor in every room! 

Here's a little bowl full of craft store pumpkins- I think it's cute and the placemat underneath was my mother's, so it's a special decoration to me.

Just a cute sign that hangs on my pantry door - I'm from Virginia and we say "Y'all". This was my mother's and I cherish it!

My little scarecrow outside! My toddler loves it and named her "Sunny". She's sure to wave goodbye to Sunny every morning on the way to preschool.

My fall wreath on my door. I'm pretty proud of it - I made it and I love it. Again, we say "Y'all" in Virginia! 

My final picture is from a tree in my backyard. These are the same trees seen in the picture from my kitchen window - this one is more up close. Isn't it beautiful? Nature at its finest!

Thanks for taking a tour of my home, I hope it brought joy and peace to you, like it does to us!